Pages

Friday, November 4, 2011

Deleting Shapefile Features

Sometimes, usually as a server-based operation, you need to delete all of the features in a shapefile. All you want left is the shapefile type, the dbf schema, and maybe the overall bounding box. This shapefile stub can then be updated by other processes. Pyshp currently doesn't have an explicit "delete" method. But because pyshp converts everything to native Python data types (strings, lists, dicts, numbers) you can usually manipulate things fairly easily. The solution is very similar to merging shapefiles but instead you are writing back to the same file instead of a new copy. There's only one hitch in this operation resulting from a minor difference in the pyshp Reader and Writer objects. In the reader the "bbox" property returns a static array of [xmin, ymin, xmax, ymax]. The Writer also has a "bbox" property but it is a method that is called when you save the shapefile. The Writer calculates the bounding box on the fly by reading all of the shapes just before saving. But in this case there are no shapes so the method would throw an error. So what we do is just override that method with a lambda function to return whatever bbox we want whether it be the original bbox or a made up one.
import shapefile 
# Read the shapefile we want to clear out
r = shapefile.Reader("myshape") 
# Create a Writer of the same type to save out as a blank
w = shapefile.Writer(r.shapeType) 
# This line will give us the same dbf schema 
w.fields = r.fields 
# Use the original bounding box in the header 
w.bbox = lambda: r.bbox 
# Save the featureless, attribute-less shapefile
w.save("myshape") 
Instead of using the original bounding box we could just populate it with 0's and let the update process repopulate it:
w.bbox = lambda: [0.0, 0.0, 0.0, 0.0]
Note coordinates in a shapefile must always be floating-point numbers. Sometimes you may not want to delete all of the features. You may want to select certain features by attribute or using a spatial operation.

Wednesday, November 2, 2011

Generating Shapefile shx Files

Shapefile shx files help software locate records
quickly but they are not strictly necessary. The
shapefile software can manually browse the
records to answer a query.
Lately I've been following traffic and responding to posts on the excellent site GIS StackExchange.  There are several questions about shapefile shx files which also point to even more questions in the ESRI forums on this topic.

If for some reason, you end up with a shapefile that is missing the shx file then most software is going to complain and refuse to deal with it.  The shapefile spec requires, at a minimum, that you have an shp, shx, and dbf file to have a complete file.  However this requirement is not a technical requirement and a lot of people seem to be confused about that. 

The shx file is a trivial index file that provides fixed-length records pointing to the byte offsets of records in  the shp file only.  It does not connect the shp file and dbf file in any way nor does it contain any sort of record number.  There are no record numbers stored in any of the three standard files which is often a point of confusion.  The software reading a shapefile has to count the number of records read to determine the record id (geometry and attributes).  If you wrote a program to randomly select a record from a shapefile there is no way to tell what the record number is by the record contents.

The purpose of the shx file is to provide faster access to a particular record in a shapefile without storing the entire record set of the shp and dbf files in memory.  The header of the shx file is 100 bytes long.  Each record is 8 bytes long.  So if I want to access record 3, I know that 2*8  = 16 and I can jump to byte 100+16=116 in the shx file, read the 8-byte record to get the offset and record length within the shp file, and then jump straight to that location in the shp file.

While the shx file is convienient it isn't necessary.  Most software balks if it is not there though.  However pyshp handles it gracefully.  If the shx index is there it is used for record access, if not then pyshp reads through the shp records into memory and handles the records as a python list.

Sometimes shx files become corrputed or go missing.  You can build a new shx index using pyshp.  It's kind of a hack but still very simple. In the following example we build an index file for a point shapefile named "myshape" that has two files: "myshape.shp" and "myshape.dbf"

# Build a new shx index file
import shapefile
# Explicitly name the shp and dbf file objects
# so pyshp ignores the missing/corrupt shx
myshp = open("myshape.shp", "rb")
mydbf = open("myshape.dbf", "rb")
r = shapefile.Reader(shp=myshp, shx=None, dbf=mydbf)
w = shapefile.Writer(r.shapeType)
# Copy everything from reader object to writer object
w._shapes = r.shapes()
w.records = r.records()
w.fields = list(r.fields)
# saving will generate the shx
w.save("myshape")

If the shx file is missing it will be created.  If it's corrupt it will be overwritten. So the moral of the story is because shapefiles consist of multiple files, it is actually a robust format. The data in the individual files can usually be accessed in isolation from the other files despite what the standard requires - assuming the software you're using is willing to cooperate.

Tuesday, October 4, 2011

Your Chance to Make GIS History

Update 6/13/12:  We finally reverse engineered the sbn indexing algorithm to an Esri-compatible level!  Please see this post: SBN Mystery Solved!


Update 3/2/12:  Getting closer still... Marc has determined there are two binning algorithms at work to determine which spatial bin a feature ends up in when a node on the tree is split as well as when a split should happen.  Also, another developer, named Francisco, has recently begun a C# implementation and seems to be making good progress.  In the comments on this post Francisco and Marc have been discussing the two algorithms.  It's hard to give a time estimate but Marc feels that this last binning/splitting case should complete the picture.


Update 11/3/11:  Work continues on this issue.  I hope to post soon on the remaining mysteries of the algorithm but we are pretty close.  I hope to do a more technical post on this issue soon to hopefully generate another round of feedback.  I will continue to post any breakthroughs here as well as create a new post when we are done.

Update 10/27/11:  Marc Pfister responded first and has been working tirelessly on this challenge. He's made a good bit of progress in unlocking the algorithm.  Si Parker joined us recently and brought some great insight that added some new direction to Marc's work.  While those guys worked on the hard stuff I created an sbx/sbn reader and writer module that can copy and manipulate these files. I believe at this point we could fool ESRI software but we are systematically closing in on the complete indexing scheme.  It's been fascinating to watch the techniques used which I'll share when it's done. 


This post is an open challenge to clever geospatial programmers everywhere. 

Background

A plot produced by sbn.py for a "world cities" shapefile spatial index
The tremendously successful shapefile format is generally considered an open format due to the fact that the shp, shx, and dbf files are documented.  But the 1998 "ESRI Shapefile Technical Description" doesn't tell the whole story.  Another part of the shapefile format is the spatial index. 

Spatial indexes create groups of features based on a given spatial clustering algorithm and define these clusters using a bounding box, usually mapped to an integer grid to avoid using floating point numbers.  When performing spatial operations you can eliminate irrelevant features by doing quick checks against rectangles before performing expensive point-in-polygon or nearest-neighbor operations.

The shapefile spatial index consists of two files: ".sbn" and ".sbx" - short for "spatial bins" and "spatial bin index".  ESRI never documented these file formats.  And whenever you edit a shapefile these indexes must be updated.  The open source community worked around this issue by creating an open spatial index for shapefiles called ".qix" - short for Quadtree index after the quadtree algorithm it uses.  But ESRI doesn't use qix and 3rd party shapefile software can't use sbn files.   This perputal incompatibility is a pain for everyone involved and results in corrupt indexes or extra coding to remove the incompatible files.

The Challenge

I am very close to ending this spatial index stalemate between ESRI software and open source.  But I have hit a wall.  I have been able to completey reverse engineer both the sbx and sbn file formats.  The problem is I don't fully understand a small portion of the sbn file.  I'm hoping the community at large will recognize the structure ESRI uses and open this format once and for all.

The Facts

The headers of both the sbx and sbn files are nearly identical to the shp and shx files.

The fixed-length record format of the sbx file is nearly identical to the documented shx file but references entries in the sbn file.  Just like the shp file any length fields are 16-bit words which you must double to get bytes.

The sbn file, as you might have guessed by now, contains "bins" which contain bounding boxes of individual features followed by the corresponding record number of that feature in the shp file.  For the bounding boxes in these bins ESRI did something very smart.  Most spatial index formats map floating point coordinates to an integer grid which is more efficient.  The point of a spatial index is not precision but relative accuracy.  However instead of using integers ESRI used chars allowing them to map coordinates to a 255x255 grid using only a single byte per coordinate instead of 4.   This trick stumped me for a while because I was looking for at least 4-byte ints.

After the header of the sbn file all of the bins are listed with a bin number and the number of records that bin contains.  After this portion the bin number is listed followed by each features bounding box and record number.  Fairly straight forward except for one thing.  In the bin list ESRI inserts empty bin records of bin # -1 to 0 with 0 # of shapes.  These "spacers" do not appear in the actual bin structure and seem to follow regular patterns of 1 to 14 empty bins in a row at different points. I considered that these empty bins were artifacts left over when an index is updated by ESRI software after editing.  However if you copy a shapefile, delete the index, and regenerate it using ArcGIS the structure looks exactly the same.  These blank bins are intentional.

Theories

I'm nearly certain ESRI did not use a quadtree for these bins because if you plot their extents they overlap which a quadtree avoids to my knowledge.  It is possible it is some version of an RTree and that the empty bins, if counted, represent tree nodes.  Because RTrees are built recursively and can contain hierarchial "empty" nodes this structure might make since.  But I just don't know enough about quadtree and RTree implementations to know what I'm looking at.  Once these zero bins are deciphered creating an ESRI-compatible reader and writer will not be difficult.  I also suspect that if we understand the structure of the file that the clustering algorithm used won't matter as long as the resulting index format is compliant.

What You Need to Get Started

I have created a zip file with enough tools and information to get a good look inside sbn and sbx files.  Download the Spatial Index Kit from the "Downloads" section of the pyshp Google Code site.  In this zip file you will find:
  • A very simple sbn format specification following the main shapefile spec conventions in pdf and excel format 
  • A very simple sbx format specification following the main shapefile spec conventions in pdf and excel format
  • A directory full of test shapefiles
  • A script, sbn.py, which reads a directory with sbn files and dumps the information in each sbn file into a text file with the same name as the shapefile. It also plots the bounding box of each bin and optionally each features box into an image using PIL and named as the shapefile. Configuration is done using variables inside the script.
  • A script, sbx.py, which also translates the contents of each sbx file into text files.
  • A script, fmtDecode.py, which is a brute force script I used to cycle through all possible data types when stepping through a binary file.  I'm vaguely aware of better tools for reverse engineering but this dumb script did the trick.
Good Luck!  Let me know if you have any questions.  I will update this post and create another post if anybody comes up with the answer.

Sunday, October 2, 2011

Pyshp Compatibility

Thanks to some outstanding work by a contributor, pyshp is now compatible with Python 2.4 to 3.x.  Before I was maintaining a separate code base for Python 3 which was falling behind.  Now everything is merged in the subversion trunk and you can use pyshp 1.1.4 or higher with either major version.

Monday, September 26, 2011

Reading Shapefiles from the Cloud

In a previous post, I wrote about saving shapefiles using pyshp to file-like objects and demonstrated how to save a shapefile to a zip file. PyShp has the ability to read from Python file-like objects including zip files as well (as of version 1.1.2).  Both the Reader object and the Writer.save() method accept keyword arguments which can be file-like objects allowing you to read and write shapefiles without any disk activity.

In this post, we'll read a shapefile directly from a zip file on a server all in memory.

Normally to read a shapefile from the file system you just pass in the name of the file to the Reader object as a string:

import shapefile
r = shapefile.Reader("myshapefile")

But if you use the keywords shp, shx, and dbf, then you can specify file-like objects.  This example will demonstrate reading a shapefile - from a zip file - on a website.

import urllib2
import zipfile
import StringIO
import shapefile

cloudshape = urllib2.urlopen("http://pyshp.googlecode.com/files/GIS_CensusTract.zip")
memoryshape = StringIO.StringIO(cloudshape.read())
zipshape = zipfile.ZipFile(memoryshape)
shpname, shxname, dbfname, prjname = zipshape.namelist()
cloudshp = StringIO.StringIO(zipshape.read(shpname))
cloudshx = StringIO.StringIO(zipshape.read(shxname))
clouddbf = StringIO.StringIO(zipshape.read(dbfname))
r = shapefile.Reader(shp=cloudshp, shx=cloudshx, dbf=clouddbf)
r.bbox
[-89.8744162216216, 30.161122135135138, -89.1383837783784, 30.661213864864862]

You may specify only one of the three file types if you are just trying to read one of the file types. Some attributes such as Reader.shapeName will not be available using this method.

File-like objects provide a lot of power. However it is important to note that not all file-like objects implement all of the file methods. In the above example the urllib2 module does not provide the "seek" method needed by the zipfile module. The ZipFile read() method is the same way.  To get around that issue, we transfer the data to the StringIO or cStringIO module in memory to ensure compatibility. If the data is potentially too big to hold in memory you can use the tempfile module to temporarily store the shapefile data on disk.

Monday, September 5, 2011

Map Projections

A reader pointed out to me recently that that the pyshp documetnatin or wiki should include something about map projections.  And he is right.   Many programmers working with shapefiles are not necessarily geospatial professionals but have found themselves working with geodata on some project.

It is very difficult to just "scratch the surface" of GIS.  You don't have to dig very deep into this field before you uncover some of the eccentricities of geographic data. Map projections are one such feature that is easy to understand at a basic level but has huge implications for geospatial programmers.

Map projections are conceptually straight-forward and intuitive.  If you try to take any three-dimensional object and flatten it onto a plane, such as your screen or a sheet of paper, the object is distorted.  (Remember the orange peel experiment from 7th grade geography?) You can manipulate this distortion to preserve common properties such as area, scale, bearing, distance, shape, etc. 

I won't go into the details of map projections as there are thousands of web pages and online videos devoted to the subject.  But there are some things you need to know for dealing with them programmatically.  First of all, most geospatial data formats don't even contain any information about map projections.  This lack of metadata is really mostly just geospatial cultural history with some technical reasons.  And furthermore, while the concept of map projections is easy to grasp, the math to transform a coordinate from one projection to another is quite complex.  The end result is most data libraries don't deal with projections in any way.

But now, thanks to modern software and the Internet making data exchange easier and more common, nearly every data format, both images and vector, have tacked on a metadata format that defines the projection.  For shapefiles this is the .prj projection file which follows the naming convention .prj   In this file, if it exists, you will find a string defining the projection in a format called well-known text or WKT.  And here's a gotch that blew my mind as a programmer a long time ago: if you don't have that projection definition, and you don't know who created the data - there is no way you are ever going to figure it out.  The coordinates in the file are just numbers and offer no clue to the projection.  You don't run into this problem much any more but it used to be quite common because GIS shops typically produced maps and not data.  All your coworkers knew the preferred projection for your shop so nobody bothered to create a bunch of metadata.  But now, modern GIS software won't even let you load a shapefile into a map without forcing you to choose a projection if it's not already defined.  And that's a good thing.

If you do need to deal with projections programmatically you basically have one choice: the PROJ4 library.  It is one of the few free libraries, if not the only library period, that comprehensively deals with re-projecting goespatial data.  Fortunately it has bindings for just about every language out there and is incorporated into many libraries including OGR.  There is a Python project called pyproj which provides python bindings.

So be aware that projections are not trivial and can often add a lot of complexity to what would otherwise be a simple programming project.  And also know that pyshp does nothing to work with map projections.  I did an earlier post on how to create a .prj file for a shapefile and why I chose not to include this functionality in the library itself.

Here are some other resources related to map projections.

SpatialReference.org - a clearning house for projection definitions

PROJ4 - the #1 map projection library

OGR2OSM - Python script to convert OGR vector formats to the Open Street Map format with projection support

PyProj - Python bindings for Proj4 library

GDAL - Python bindings to GDAL which contains OGR and PROJ4 allowing you to reporject raster and vector data

Friday, September 2, 2011

Pyshp now available via setuptools

The Python Shapefile Library (a.k.a pyshp) is now properly registered on the Python Package Index so it can be installed via setuptools and, possibly more importantly, registered as a dependency by other packages.  At this time the "usage.py" doctests also download with it but not the sample blockgroups shapefile.  I will eventually rewrite the doctests to create a sample shapefile used to verify the reader class.  It is available as both an egg and source distribution.

I'd like to thank users "memedough" and Sebastian for pushing me to go ahead and set this up because yes I'm that lazy where after 2 years I still hadn't bothered to spend the 15 minutes to do it.

If you have setuptools installed, just run: easy_install pyshp

The setup.py script is also now in the subversion respoistory on google code just so I don't lose track of it.  The PyPi page can be found here:

http://pypi.python.org/pypi/pyshp/

Wednesday, August 24, 2011

Smoothed Best Estimate of Trajectory (SBET) Format

A buddy of mine in the LiDAR industry asked me if we had any software which could handle the Applanix SBET binary format.  I wasn't familiar with it but it turns out on Google the only parsers you can find just happend to be in Python. 

I'm still not 100% sure what these datasets do so if you know feel free to post a comment.

So if you need to work with this format here are two options:

http://arsf-dan.nerc.ac.uk/trac/attachment/wiki/Processing/SyntheticDataset/sbet_handler.py

http://schwehr.blogspot.com/2010/12/best-possible-python-file-reading.html

And if you're into LiDAR you are probably already aware of PyLAS for the LAS format;

http://code.google.com/p/pylas/

Tuesday, August 23, 2011

Point in Polygon 2: Walking the line

Credit: SpikedMath.com
This post is a follow-up to my original article on testing if a point is inside a polygon.  Reader Sebastian V. pointed out the ray-casting alogrithm I used does not test to see if the point is on the edge of the polygon or one of the verticies.  He was even nice enough to send a PHP script he found which uses an indentical ray-casting method and includes a vertex and edge test as well.

These two checks are relatively simple however whether they are necessary is up to you and how you apply this test.  There are some cases where a boundary point would not be considered for inclusion.  Either way now you have an option.  This function could even be modified to optionally check for boundary points.

# Improved point in polygon test which includes edge
# and vertex points

def point_in_poly(x,y,poly):

   # check if point is a vertex
   if (x,y) in poly: return "IN"

   # check if point is on a boundary
   for i in range(len(poly)):
      p1 = None
      p2 = None
      if i==0:
         p1 = poly[0]
         p2 = poly[1]
      else:
         p1 = poly[i-1]
         p2 = poly[i]
      if p1[1] == p2[1] and p1[1] == y and x > min(p1[0], p2[0]) and x < max(p1[0], p2[0]):
         return "IN"
      
   n = len(poly)
   inside = False

   p1x,p1y = poly[0]
   for i in range(n+1):
      p2x,p2y = poly[i % n]
      if y > min(p1y,p2y):
         if y <= max(p1y,p2y):
            if x <= max(p1x,p2x):
               if p1y != p2y:
                  xints = (y-p1y)*(p2x-p1x)/(p2y-p1y)+p1x
               if p1x == p2x or x <= xints:
                  inside = not inside
      p1x,p1y = p2x,p2y

   if inside: return "IN"
   else: return "OUT"

# Test a vertex for inclusion
poligono = [(-33.416032,-70.593016), (-33.415370,-70.589604),
(-33.417340,-70.589046), (-33.417949,-70.592351),
(-33.416032,-70.593016)]
lat= -33.416032
lon= -70.593016

print point_in_poly(lat, lon, poligono)

# test a boundary point for inclusion
poly2 = [(1,1), (5,1), (5,5), (1,5), (1,1)]
x = 3
y = 1
print point_in_poly(x, y, poly2)
You can download this script here.

Saturday, August 20, 2011

Create a Zipped Shapefile

Shapefiles consist of at least three files. So zipping up these files is a a common means of moving them around - especially in web applications. You can use PyShp and Python's zipfile module to create a zipped shapefile without ever saving the shapefile to disk (or the zip file for that matter).

Python's "zipfile" module allows you to write files straight from buffer objects including python's StringIO or cStringIO modules. For web applications where you will return the zipped shapefile as part of an http response, you can write the zip file itself to a file-like object without writing it to disk. In this post, the example writes the zip file to disk.

In Python, file-like objects provide a powerful way to re-route complex data structures from the disk to other targets such as a database, memory data structures, or serialized objects. In most other programming languages file-like objects are called "streams" and work in similar fashion. So this post also demonstrates writing shapefiles to file-like objects using a zip file as a target.

Normally when you save a shapefile you call the writer.save method which writes three files to disk. To use file-like objects you call separate save methods for each file: writer.saveShp, writer.saveShx, and writer.saveDbf.

import zipfile
import StringIO
import shapefile

# Set up buffers for saving
shp = StringIO.StringIO()
shx = StringIO.StringIO()
dbf = StringIO.StringIO()

# Make a point shapefile
w = shapefile.Writer(shapefile.POINT)
w.point(90.3, 30)
w.point(92, 40)
w.point(-122.4, 30)
w.point(-90, 35.1)
w.field('FIRST_FLD')
w.field('SECOND_FLD','C','40')
w.record('First','Point')
w.record('Second','Point')
w.record('Third','Point')
w.record('Fourth','Point')

# Save shapefile components to buffers
w.saveShp(shp)
w.saveShx(shx)
w.saveDbf(dbf)

# Save shapefile buffers to zip file 
# Note: zlib must be available for
# ZIP_DEFLATED to compress.  Otherwise
# just use ZIP_STORED.
z = zipfile.ZipFile("myshape.zip", "w", zipfile.ZIP_DEFLATED)
z.writestr("myshape.shp", shp.getvalue())
z.writestr("myshape.shx", shx.getvalue())
z.writestr("myshape.dbf", dbf.getvalue())
z.close()

If you've been using PyShp for awhile make sure you have the latest version. The file-like object save feature was uploaded to the PyShp subversion repository on Aug. 20, 2011 at revision 30.

You can download PyShp here.

You download the sample script above here.

Tuesday, August 16, 2011

Geospatial News Apps

The Tribune's "Englewood" module helps you create very
scalable dot-desnity maps and is named after a well-known
Chicago neighborhood.
My background started in the newspaper business so I was pleased to see "The Chicago Tribune" has its own developers who maintain a newspaper technology blog.  Newspapers have always worked with census data to back up news stories but the Tribune staff takes it much further.  Through their blog they document apps they have created and release them as open source.  In an age when many newspapers have folded because of advances in technology this team is using it to take Journalism in interesting new directions.

In a recent post on the Tribune's "News App Blog", they published a module for creating elaborate dot-density maps named "Englewood".  They referenced my post "Dot Density Maps with Python and OGR" and turned that sample into the Englewood module named after the beleaguered Chicago neighborhood which often appears in the news.

The Tribune team pulls in several other tools and goes through the details of going all the way from census data to online dot-density maps.  In addition to the basic how-to of producing the data they cover how they made the production really fast and deployed it to a massively-scalable S3 Amazon server.  The blog gives a lot of insight into how a newspaper uses technology to apply geospatial technology in support of the news.  Way more info than you get from your typical code-snippet blog.  Fascinating stuff.

Thursday, May 5, 2011

New Member added to the PyShp Team

Great news - Nicholas Lederer who works with the University of Washington Applied Physics Laboratory recently joined the committers for PyShp.  He has already made some significant contributions (i.e. bug squashing) to the library in his spare time.   He also has bigger design ideas on how to address some issues to make code maintenance easier as contributors grow. We have also been dealing with some niche but important issues elevation values, dbf header fields, and all-too-common incorrect shapefiles produced by other libraries.

I originally wrote this library because I wanted an easy way to read and write shapefiles in pure Python.  That option simply didn't exist from the time I entered the geospatial field in 2000 until 2004 when I started developing this library in my free time.  Hurricane Katrina slowed down the development tremendously for a few years but by 2010 I had finished it.

In those 10 years since I first started looking for a library like PyShp, Python grew tremendously in popularity but nobody developed this kind of library.  The field of geospatial technology also grew and the technology and standards changed radically but shapefiles still seem to stubbornly persist as the most common way to store and exchange geospatial vector data.

Given the library was still potentially relevant I guessed there were at least 4 other people in the world who had a need to write shapefiles in Python as simply as possible.  It turns out there are hundreds, maybe thousands of people who have this need.  And there is no doubt Python itself is firmly entrenched in geospatial technology in general.

I'm looking forward to this library reaching its full potential through a collaborative effort.  Thanks to everybody who has identified issues, provided patches, and joined in this shared interest.

If you're new to this blog and want to help or be helped be sure to check out:

Monday, March 21, 2011

Working with Elevation Values in Shapefiles

I've had several questions about working with elevation values in shapefiles.  Awhile back I  posted a brief example in the wiki on the google code project site and felt it should be included here so this information is more visible.


Elevation values, known as "Z" values allow you to create 3-dimensional shapefiles. Working with elevation values in the Python Shapefile Library is easy but requires a step which hasn't been well documented until now. Make sure you are working with at least version 1.0 (revision 24 in the repository) as previous versions have a bug that prevents elevation values from being written properly as well as another bug which occurs when creating certain polygons.

The shapefile specification allows for three types of 3-dimensional shapefiles:
PointZ - a 3D point shapefile, PolylineZ - a 3D line shapefile, and PolygonZ - a 3D polygon shapefile.

The most important thing to remember is to explicitly set the shape type of each record to the correct shape type or it will default to a 2-dimensional shape. Eventually the library will automatically detect the elevation type.
Here is a brief example of creating a PolygonZ shapefile:

import shapefile
w = shapefile.Writer(shapeType=shapefile.POLYGONZ)
# OR you can type
# w = shapefile.Writer(shapeType=15)
w.poly([[[-89.0, 33, 12], [-90, 31, 11], [-91, 30, 12]]], shapeType=15)
w.field("NAME")
w.record("PolyZTest")
w.save("MyPolyZ")

When you read 3D shapefiles the elevation values will be stored separately:

>>>import shapefile
>>>r = shapefile.Reader("MyPolyZ")
>>>r.shapes()[0].points
[[-89.0, 33.0], [-90.0, 31.0], [-91.0, 30.0]]
>>>r.shapes()[0].z
[12, 11, 12]

So remember: explicitly set the shapetype for each shape you add to ensure the z values are maintained. And know that the z values are stored in the "z" property of each shape instead of being integrated with the x,y value lists.

Monday, February 28, 2011

Changing a Shapefile's Type

A polygon, line, and point version of the same shapefile.
Sometimes you want to convert a shapefile from one type to another.  For example you may want to convert a line shapefile to a polygon or a polygon to a point or multipoint shapefile.  There are many reasons for this type of operations ranging from error checking, to special queries, to inconvenient distribution formats.  For example a lot of coastline data is distributed as line data but you may want to convert it to a polygon to estimate coastal erosion using area comparisons between two different dates.

Performing this type of conversion is very straightforward using the Python Shapefile Library.  In fact the conversion is basically a one-off version of the shapefile merge example I wrote about recently.  You read in one shapefile and write the features and records out to another of the correct type.  There are a couple of pitfalls you need to be wary of though.  One is the current version (1.0) of the PSL requires you to explicitly set the shape type of each record if you want to convert them.  The second issue is if you are converting to a single point shapefile where each point feature is a record you must compensate for the imbalance in the dbf records by copying the record from the parent feature for each point.  Instead of dealing with this issue you could simply create a multi-point shapefile where each shape record is allowed to be a collection of points.  Which method you choose depends on what you are trying to do with the output.  The examples below cover both methods.

The example in this post takes a state boundary polygon file and converts it to a line shapefile, then a multipoint shapefile, then a regular point shapefile.  Note the difference between the point shapefile and the line and multipoint examples.

"""
Convert one shapefile type to another 
"""

import shapefile


# Create a line and a multi-point 
# and single point version of
# a polygon shapefile

# The shapefile type we are converting to
newType = shapefile.POLYLINE

# This is the shapefile we are trying
# to convert. In this case it's a
# state boundary polygon file for 
# Mississippi with one polygon and
# one dbf record.
r = shapefile.Reader("Mississippi")

## POLYLINE version
w = shapefile.Writer(newType)
w._shapes.extend(r.shapes())
# You must explicity set the shapeType of each record.
# Eventually the library will set them to the same
# as the file shape type automatically.
for s in w.shapes():
  s.shapeType = newType
w.fields = list(r.fields)
w.records.extend(r.records())
w.save("Miss_Line")

## MULTIPOINT version
newType = shapefile.MULTIPOINT

w = shapefile.Writer(newType)
w._shapes.extend(r.shapes())
for s in w.shapes():
  s.shapeType = newType
w.fields = list(r.fields)
w.records.extend(r.records())
w.save("Miss_MPoint")

## POINT version
newType = shapefile.POINT

w = shapefile.Writer(newType)
# For a single point shapefile
# from another type we
# "flatten" each shape
# so each point is a new record.
# This means we must also assign
# each point a record which means
# records are usually duplicated.
for s in r.shapeRecords():
  for p in s.shape.points:
    w.point(*p)
    w.records.append(s.record)  
w.fields = list(r.fields)
w.save("Miss_Point")

You can download the state boundary polygon shapefile used in the example from the GeospatialPython Google Code Project Downloads section.  You can download the sample script above from the subversion repository of that same project.

And of course the Python Shapefile Library is here.

Tuesday, February 22, 2011

Clip a Raster using a Shapefile

Clipping a satellite image: Rasterize, Mask, Clip, Save
If you read this blog you see most of the material covers shapefiles.  The intent of this blog is to cover remote sensing as well and this article provides a great foundation for remote sensing in Python. In this post I'll demonstrate how to use several Python libraries to to create a script which can take any polygon shapefile and use it as a mask to clip a geospatial image.  Although I'm demonstrating a fairly basic process, this article and the accompanying sample script is densely-packed with lots of good information and tips that would take you hours if not days to piece together reading forum posts, mailing lists, blogs, and trial and error.  This post will get you well on your way to doing whatever you want to do with Python and Remote Sensing.

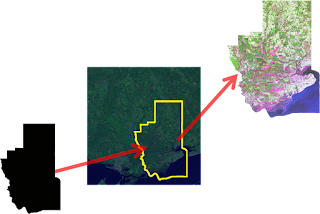
Satellite and aerial images are usually collected in square tiles more or less the same way your digital camera frames and captures a picture.  Geospatial images are data capturing different wavelengths of light reflected from known points on the Earth or even other planets.  GIS professionals routinely clip these image tiles to a specific area of interest to provide context for vector layers within a GIS map.  This technique may also be used for remote sensing to narrow down image processing to specific areas to reduce the amount of time it takes to analyze the image.

The Process

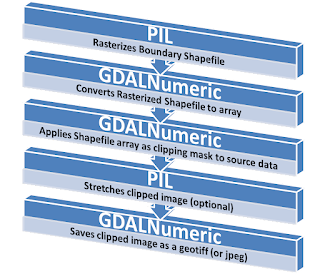
Clipping a raster is a series of simple button clicks in high-end geospatial software packages.  In terms of computing, geospatial images are actually very large, multi-dimensional arrays.  Remote Sensing at its simplest is performing mathematical operations on these arrays to extract information from the data. Behind the scenes here is what the software is doing (give or take a few steps):
  1. Convert the vector shapefile to a matrix which can be used as mask
  2. Load the geospatial image into a matrix
  3. Throw out any image cells outside of the shapefile extent
  4. Set all values outside the shapefile boundary to NODATA (null) values
  5. OPTIONAL: Perform a histogram stretch on the image for better visualization
  6. Save the resulting image as a new raster.
Geospatial Python Raster Clipping Workflow
Tools

Two things I try to do on this blog are build on techniques used in previous posts and focus on pure-Python solutions as much as possible.  The script featured in this post will use one of the shapefile rasterization techniques I've written about in the past.  However I did not go pure-Python on this for several reasons.  Geospatial image formats tend to be extremely complex.  You could make a career out of reading and writing the dozens of evolving image formats out there.  As the old saying goes TIFF stands for "Thousands of Incompatible File Formats".  So for this reason I use the Python bindings for GDAL when dealing with geospatial raster data.  The other issue is the size of most geospatial raster data.  Satellite and high-resolution aerial images can easily be in the 10's to 100's of megabytes size range.  Doing math on these images and the memory required to follow the six step process outlined above exceeds the capability of Python's native libraries in many instances.  For this reason I use the Numpy library which is dedicated to large, multi-dimensional matrix math.  Another reason to use Numpy is tight integration with GDAL in the form of the "GDALNumeric" module. (Numeric was the predecessor to Numpy) In past posts I showed a pure-Python way to rasterize a shapefile.  However I use the Python Imaging Library (PIL) in this example because it provides convenient methods to move data back and forth between Numpy.

Library Installation

So in summary you will need to install the following packages to make the sample script work.  Usually the Python Disutils system (i.e. the "easy_install" script) is the fastest and simplest way to install a Python library.  Because of the complexity and dependencies of some of these tools you may need to track down a pre-compiled binary for your platform.  Both Numpy and GDAL have them linked from their respective websites or the Python Package Index.

The Example

# RasterClipper.py - clip a geospatial image using a shapefile

import operator
from osgeo import gdal, gdalnumeric, ogr, osr
import Image, ImageDraw

# Raster image to clip
raster = "SatImage.tif"

# Polygon shapefile used to clip
shp = "county"

# Name of clip raster file(s)
output = "clip"

# This function will convert the rasterized clipper shapefile 
# to a mask for use within GDAL.    
def imageToArray(i):
    """
    Converts a Python Imaging Library array to a 
    gdalnumeric image.
    """
    a=gdalnumeric.fromstring(i.tostring(),'b')
    a.shape=i.im.size[1], i.im.size[0]
    return a

def arrayToImage(a):
    """
    Converts a gdalnumeric array to a 
    Python Imaging Library Image.
    """
    i=Image.fromstring('L',(a.shape[1],a.shape[0]),
            (a.astype('b')).tostring())
    return i
     
def world2Pixel(geoMatrix, x, y):
  """
  Uses a gdal geomatrix (gdal.GetGeoTransform()) to calculate
  the pixel location of a geospatial coordinate 
  """
  ulX = geoMatrix[0]
  ulY = geoMatrix[3]
  xDist = geoMatrix[1]
  yDist = geoMatrix[5]
  rtnX = geoMatrix[2]
  rtnY = geoMatrix[4]
  pixel = int((x - ulX) / xDist)
  line = int((ulY - y) / yDist)
  return (pixel, line) 

def histogram(a, bins=range(0,256)):
  """
  Histogram function for multi-dimensional array.
  a = array
  bins = range of numbers to match 
  """
  fa = a.flat
  n = gdalnumeric.searchsorted(gdalnumeric.sort(fa), bins)
  n = gdalnumeric.concatenate([n, [len(fa)]])
  hist = n[1:]-n[:-1] 
  return hist

def stretch(a):
  """
  Performs a histogram stretch on a gdalnumeric array image.
  """
  hist = histogram(a)
  im = arrayToImage(a)   
  lut = []
  for b in range(0, len(hist), 256):
    # step size
    step = reduce(operator.add, hist[b:b+256]) / 255
    # create equalization lookup table
    n = 0
    for i in range(256):
      lut.append(n / step)
      n = n + hist[i+b]
  im = im.point(lut)
  return imageToArray(im)

# Load the source data as a gdalnumeric array
srcArray = gdalnumeric.LoadFile(raster)

# Also load as a gdal image to get geotransform 
# (world file) info
srcImage = gdal.Open(raster)
geoTrans = srcImage.GetGeoTransform()

# Create an OGR layer from a boundary shapefile
shapef = ogr.Open("%s.shp" % shp)
lyr = shapef.GetLayer(shp)
poly = lyr.GetNextFeature()

# Convert the layer extent to image pixel coordinates
minX, maxX, minY, maxY = lyr.GetExtent()
ulX, ulY = world2Pixel(geoTrans, minX, maxY)
lrX, lrY = world2Pixel(geoTrans, maxX, minY)

# Calculate the pixel size of the new image
pxWidth = int(lrX - ulX)
pxHeight = int(lrY - ulY)

clip = srcArray[:, ulY:lrY, ulX:lrX]

# Create a new geomatrix for the image
geoTrans = list(geoTrans)
geoTrans[0] = minX
geoTrans[3] = maxY

# Map points to pixels for drawing the 
# boundary on a blank 8-bit, 
# black and white, mask image.
points = []
pixels = []
geom = poly.GetGeometryRef()
pts = geom.GetGeometryRef(0)
for p in range(pts.GetPointCount()):
  points.append((pts.GetX(p), pts.GetY(p)))
for p in points:
  pixels.append(world2Pixel(geoTrans, p[0], p[1]))
rasterPoly = Image.new("L", (pxWidth, pxHeight), 1)
rasterize = ImageDraw.Draw(rasterPoly)
rasterize.polygon(pixels, 0)
mask = imageToArray(rasterPoly)   

# Clip the image using the mask
clip = gdalnumeric.choose(mask, \
    (clip, 0)).astype(gdalnumeric.uint8)

# This image has 3 bands so we stretch each one to make them
# visually brighter
for i in range(3):
  clip[i,:,:] = stretch(clip[i,:,:])

# Save ndvi as tiff
gdalnumeric.SaveArray(clip, "%s.tif" % output, \
    format="GTiff", prototype=raster)

# Save ndvi as an 8-bit jpeg for an easy, quick preview
clip = clip.astype(gdalnumeric.uint8)
gdalnumeric.SaveArray(clip, "%s.jpg" % output, format="JPEG")

Tips and Further Reading

The utility functions at the beginning of this script are useful whenever you are working with remotely sensed data in Python using GDAL, PIL, and Numpy.

If you're in a hurry be sure to look at the GDAL utility programs.  This collection has a tool for just about any simple operation including clipping a raster to a rectangle.  Technically you could accomplish the above polygon clip using only GDAL utilities but for complex operations like this Python is much easier.

The data referenced in the above script are a shapefile and a 7-4-1 Path 22, Row 39 Landsat image from 2006. You can download the data and the above sample script from the GeospatialPython Google Code project here.

I would normally use the Python Shapefile Library to grab the polygon shape instead of OGR but because I used GDAL, OGR is already there. So why bother with another library?

If you are going to get serious about Remote Sensing and Python you should check out OpenEV.  This package is a complete remote sensing platform including an ERDAS Imagine-style viewer.  It comes with all the GDAL tools, mapserver and tools, and a ready-to-run Python environment.

I've written about it before but Spectral Python is worth a look and worth mentioning again. I also recently found PyResample on Google Code but I haven't tried it yet.  

Beyond the above you will find bits and pieces of Python remote sensing code scattered around the web.  Good places to look are:
More to come!

UPDATE (May 4, 2011): I usually provide a link to example source code and data for instructional posts. I set up the download for this one but forgot to post it.  This zip file contains everything you need to perform the example above except the installation of GDAL, Numpy, and PIL:
http://geospatialpython.googlecode.com/files/clipraster.zip

Make sure the required libraries are installed and working before you attempt this example.  As I mention above the OpenEV package has a Python environment with all required packages except PIL.  It may take a little work to get PIL into this unofficial Python environment but in my experience it's less work than wrangling GDAL into place.

Saturday, February 12, 2011

Create a .prj Projection File for a Shapefile

An example of a cordiform map projection a.k.a. 
heart-shaped projection
. Happy Valentine's!
If you create a shapefile with ESRI software or receive one from someone who did you may see a ".prj" file included along with the shp, shx, and dbf files.  In fact, the prj file is one of up to 9 possible "official" file extensions for various indexes and other meta files.  Most of these file formats are proprietary.  There are an additional two formats created by the open source community to work around the closed formats created by ESRI for spatial indexing.

The shapefile format does not allow for specifying the map projection of the data. When ESRI created the shapefile format everyone worked with data in only one projection. If you tried to load a layer in a different projection into your GIS weird things would happen.  Not too long ago as hardware capability increased according to Moore's Law, GIS software packages developed the ability to reproject geospatial layers on the fly.  You could now load in layers in any projection and as long as you told the software what projections were involved the map would come together nicely.

ArcGIS 8.x allowed you to manually assign each layer a projection.  This information was stored in the prj file.  The prj file contains a WKT (Well-Known Text) string which has all the parameters for the map projection. So the format is quite simple and was created by the Open GIS Consortium.

But there are several thousand "commonly-used" map projections which were standardized by the European Survey Petroleum Group (EPSG). And there's no way to accurately detect the projection from the coordinates in the shapefile. For these reasons the Python Shapefile Library does not currently handle prj files.

If you need a prj file, the easiest thing to do is write one yourself. The following example creates a simple point shapefile and then the corresponding prj file using the WGS84 "unprojected" WKT.

import shapefile as sf
filename = 'test/point'

# create the shapefile
w = sf.Writer(sf.POINT)
w.point(37.7793, -122.4192)
w.field('FIRST_FLD')
w.record('First','Point')
w.save(filename)

# create the PRJ file
prj = open("%s.prj" % filename, "w")
epsg = 'GEOGCS["WGS 84",'
epsg += 'DATUM["WGS_1984",'
epsg += 'SPHEROID["WGS 84",6378137,298.257223563]]'
epsg += ',PRIMEM["Greenwich",0],'
epsg += 'UNIT["degree",0.0174532925199433]]'
prj.write(epsg)
prj.close()

I've thought about adding the ability to optionally write prj files but the list of "commonly-used" WKT strings is over .5 megs and would be bigger than the shapefile library itself.  I may eventually work something out though.

The easiest thing to do right now is just figure out what WKT string you need for your data and write a file after you save your shapefile. If you need a list of map projection names, epsg codes, and corresponding WKT strings you can download it from the geospatialpython Github "Learn" repository here.

A word of warning if you are new to GIS and shapefiles: the prj file is just metadata about your shapefile.  Changing the projection reference in the prj file will not change the actual projection of the geometry and will just confuse your GIS software.

Thursday, February 10, 2011

Merging Lots of Shapefiles (quickly)

Arne, over at GIS-Programming.com, recently posted about merging shapefiles using a batch process. I can't remember the last time I merged two or more shapefiles but after googling around it is a very common use case.  GIS forums are littered with requests for the best way to batch merge a directory full of files.  My best guess is people have to work with automatically-generated, geographically disperse data with a common projection and database schema.  I imagine these files would be the result of some automated sensor output. If you know some use cases requiring merging many shapefiles I'd be curious to hear about it.

Arne pointed out that all the code samples out there iterate through each feature in a shapefile and add them to the merged file.  He says this method is slow. I agree to an extent (no pun intended).  However, at some point the underlying shapefile library MUST iterate through each feature in order to generate the summary information, namely the bounding box, required to write a valid shapefile header.  But it is theoretically slightly more efficient to wait until the merge is finished so there is only one iteration cycle.  At the very least, waiting till the end requires less code.

The following example merges all the shapefiles in the current directory into one file and it is quite fast.

# Merge a bunch of shapefiles with attributes quickly!
import glob
import shapefile
files = glob.glob("*.shp")
w = shapefile.Writer()
for f in files:
  r = shapefile.Reader(f)
  w._shapes.extend(r.shapes())
  w.records.extend(r.records())
w.fields = list(r.fields)
w.save("merged")

Wednesday, February 2, 2011

Python 3 Version of the Python Shapefile Library Released

I created a "hasty" port of the Python Shapefile Library to Python 3 at the request of a developer.  You can download it from the Subversion repository at the "pyshp" project on Google Code.  You will now find the subversion trunk contains "Python 2" and "Python 3" folders.  The documentation available in the "Downloads" section of the project site contains two sets of documentation now as well.  The Python 3 version is tagged with "Py3".

The versions function identically however the "Editor" class is broken in the Python 3 version and this issue is documented in the instructions and the code.  This class is not necessary to read and write shapefiles. It is just a convenience class and will be fixed in a future version.  I have only made the Py 3 version pass the doctests - nothing more.  So bug reports are welcome.

I also plan to make the Python 2 version compatible with Jython.  Initial testing shows that it too works except for the Editor class.  I'd appreciate any feedback if you are using it on that platform.  The same applies to IronPython and even PythonCE which I haven't tested at all.

Because of the reorganization of the source tree many of the links on previous posts may be broken.  I should have these repaired shortly. [UPDATE: All links have been corrected 2/11/11]

Both versions will be updated and maintained indefinitely as it will probably take several years for Python 3 to become mainstream - especially in the geospatial community. Many, many geospatial libraries will require porting to 3.  I used the "2to3" script but found that most of the work was in casting strings and byte arrays which is no longer implicit.  The library packs and unpacks data constantly so this change had a huge impact on the shapefile library.  Python 2 made it easy to be lazy with data types.

Wednesday, January 19, 2011

Point in Polygon

The Ray Casting Method tests if a point is inside a polygon.
UPDATE: There's a newer version of this algorithm that accounts for points that fall on the boundary of a polygon which are included as inside the polygon. The title is "Point in Polygon 2: Walking the line" and was published Aug. 23, 2011.

A fundamental geospatial operation is checking to see if a point is inside a polygon.  This one operation is the atomic building block of many, many different types of spatial queries.  This operation seems deceptively simple because it's so easy to see and comprehend visually. But doing this check computationally gets quite complex.

At first glance there are dozens of algorithms addressing this challenge.  However they all have special cases where they fail.  The failures come from the infinite number of ways polygons can form which ultimately foil any sort of systematic check.  For a programmer the choice comes down to a compromise between computational efficiency (i.e. speed in this case) and thoroughness (i.e. how rare the exceptions are).

The best solution to this issue I've found is the "Ray Casting Method".  The idea is you start drawing an imaginary line from the point in question and stop drawing it when the line leaves the polygon bounding box. Along the way you count the number of times you crossed the polygon's boundary.  If the count is an odd number the point must be inside.  If it's an even number the point is outside the polygon.  So in summary, odd=in, even=out - got it?

This algorithm is fast and is accurate.  In fact, pretty much the only way you can stump it is if the point is ridiculously close to the polygon boundary where a rounding error would merge the point with the boundary.  In that case you can just blame your programming language and switch to Python.

I had no intention of implementing this algorithm myself so I googled several options, tried them out, and found a winner.  It's interesting but not surprising that most of the spatial algorithms I find and use come from computer graphics sites, usually gaming sites or computer vision sites, as opposed to geospatial sites.  My favorite ray casting point-in-polygon sample came from the "Simple Machine Forum" at "PSE Entertainment Corp".  It was posted by their anonymous webmaster.

# Determine if a point is inside a given polygon or not
# Polygon is a list of (x,y) pairs. This function
# returns True or False.  The algorithm is called
# the "Ray Casting Method".

def point_in_poly(x,y,poly):

    n = len(poly)
    inside = False

    p1x,p1y = poly[0]
    for i in range(n+1):
        p2x,p2y = poly[i % n]
        if y > min(p1y,p2y):
            if y <= max(p1y,p2y):
                if x <= max(p1x,p2x):
                    if p1y != p2y:
                        xints = (y-p1y)*(p2x-p1x)/(p2y-p1y)+p1x
                    if p1x == p2x or x <= xints:
                        inside = not inside
        p1x,p1y = p2x,p2y

    return inside

## Test

polygon = [(0,10),(10,10),(10,0),(0,0)]

point_x = 5
point_y = 5

## Call the function with the points and the polygon
print point_in_poly(point_x,point_y,polygon)

Easy to read, easy to use.  In a previous post on creating a dot density profile, I used the "contains" method in OGR to check randomly-generated points representing population counts against US Census Bureau tracts.  That script created a point shapefile which could then be added as a layer.  It worked great but it wasn't pure python because of OGR.  The other problem with that recipe is creating a shapefile is overkill as dot density maps are just a visualization.

I decided to build on some other posts to combine this ray casting method, PNGCanvas, and the Python Shapefile Library to create a lightweight, pure Python dot density map implementation. The following code reads in a shapefile of census tracts, looks at the population value for that tract, then randomly draws a dot within that census tract for every 50 people.  The census tract boundaries are also added to the resulting PNG image.  The conventional wisdom, especially in the geospatial world, states if you need to do a large number of costly calculations it's worth using C because Python will be much slower.  To my surprise the pure Python version was just about as quick as the OGR version.  I figured the point-in-polygon calculation would be the most costly part.  The results are close enough to warrant further detailed profiling which I'll do at some point.  But regardless this operation is much, much quicker in pure Python than I expected.

import random
import shapefile
import pngcanvas

def pip(x,y,poly):
    n = len(poly)
    inside = False
    p1x,p1y = poly[0]
    for i in range(n+1):
        p2x,p2y = poly[i % n]
        if y > min(p1y,p2y):
            if y <= max(p1y,p2y):
                if x <= max(p1x,p2x):
                    if p1y != p2y:
                        xints = (y-p1y)*(p2x-p1x)/(p2y-p1y)+p1x
                    if p1x == p2x or x <= xints:
                        inside = not inside
        p1x,p1y = p2x,p2y
    return inside

# Source shapefile - can be any polygon
r = shapefile.Reader("GIS_CensusTract_poly.shp")

# pixel to coordinate info
xdist = r.bbox[2] - r.bbox[0]
ydist = r.bbox[3] - r.bbox[1]
iwidth = 600
iheight = 500
xratio = iwidth/xdist
yratio = iheight/ydist

c = pngcanvas.PNGCanvas(iwidth,iheight,color=[255,255,255,0xff])

# background color
c.filledRectangle(0,0,iwidth,iheight)

# Pen color
c.color = [139,137,137,0xff]

# Draw the polygons 
for shape in r.shapes():
  pixels = []
  for x,y in shape.points:  
    px = int(iwidth - ((r.bbox[2] - x) * xratio))
    py = int((r.bbox[3] - y) * yratio)
    pixels.append([px,py])
  c.polyline(pixels)

rnum = 0
trnum = len(r.shapeRecords())
for sr in r.shapeRecords():
  rnum += 1
  #print rnum, " of ", trnum
  density = sr.record[20]
  total = int(density / 50)
  count = 0
  minx, miny, maxx, maxy = sr.shape.bbox   
  while count < total:    
    x = random.uniform(minx,maxx)
    y = random.uniform(miny,maxy)    
    if pip(x,y,sr.shape.points):
      count += 1
      #print " ", count, " of ", total
      px = int(iwidth - ((r.bbox[2] - x) * xratio))
      py = int((r.bbox[3] - y) * yratio)
      c.point(px,py,color=[255,0,0,0xff])

f = file("density_pure.png", "wb")
f.write(c.dump())
f.close()

The shapefile used above can be found here.

You can download PNGCanvas here.

And the Python Shapefile Library is here.